resume based on FortySecondsCV template
https://github.com/PandaScience/FortySecondsCV
 Adrien Carteron
2eb58841aa
[fix] some fields
Adrien Carteron
2eb58841aa
[fix] some fields
|
3 ani în urmă | |
|---|---|---|
| pics | 3 ani în urmă | |
| .gitignore | 3 ani în urmă | |
| LICENSE | 3 ani în urmă | |
| README.md | 3 ani în urmă | |
| cv.tex | 3 ani în urmă | |
| devicons.sty | 3 ani în urmă | |
| fortysecondscv.cls | 3 ani în urmă | |
| template.tex | 3 ani în urmă |
README.md
Forty Seconds CV
中文 | Nederlands
Description
Just another CV class for LaTeX - but this time highly customizable!
This project can be regarded as a major rewrite of the original twentysecondcv class. It does not aim to provide a new CV style that you can't find anywhere else, but rather takes a very well established one and adds a straightforward user interface to almost all layout elements and thus creates a highly customizable framework-class: FortySecondsCV.
Just try it yourself starting from template.tex!
When you should use twentysecondcv or altacv or any other LaTeX CV class:
- You are happy with the layout elements offered by the existing CV class styles
- You don't need to change paper sizes / formats at all
- You don't want to customize your CV further
When you should use the FortySecondsCV class:
- You like to build a CV optimized for 2 pages incl. a sidebar (with option for additional pages)
- You want to highly customize your CV using a great palette of colors and layout elements
- You don't want to modify any definition in the class file
- You prefer an easy-to-use user interface to almost all style elements
- You need a cleanly written class file in case you decide to change low-level class definitions
Attributions
- This LaTeX CV class is based on the style ideas of the twentysecondscv class by Carmine Spagnuolo
- Language icons in the template are taken from gosquared's repository
Requirements
You need to compile your document with XeLaTeX or LuaLaTeX in order to have
the latest Font Awesome icons (fontawesome5) and Academicons. If you still
want to compile with pdfLaTeX for whatever reason, FortySecondsCV will fall
back to the older icon package ( Academicons won't be
available.fontawesome), where some icons look
different and some others are not even included
License
Forty Seconds CV is distributed under the BSD 3-Clause license. See LICENSE file for more information.
User Interface
Class Options
Possible options that can be passed to FortySecondsCV are:
- all valid options for the standard article class like e.g.
a4paperor11pt. sidesectionsizesets the font size of sidebar section titles to\large,\huge, etc. when assigned tolarge,huge, etc. (i.e. w/o leading slash)showframeswill show frames around the sidebar and body texts that help to adjust margins correctly. Note, that this will move content of tables slightly since tabular lines also take some space.vline=<length>plots a red vertical line at x-position<length>to help adjust sidebar content.maincolor=<color>sets the theme color used for the entire sidebar incl. headings, icons, and charts. Many colors are derived from it.sidecolor=<color>sets the background color of the sidebar.sidetextcolor=<color>sets the color of text located in the sidebar.sectioncolor=<color>sets the color of section headings in the body text.itemtextcolor=<color>sets the color of cvitem descriptions.subsectioncolor=<color>same as sectioncolor for subsections.sidebarwidth=<length>sets the total width of the sidebar, i.e. the width of the visible sidebar color.topbottommargin=<length>sets the top and bottom page margin for both columns.leftrightmargin=<length>sets the left and right page margin for both columns as well as how much space will be between both columns.profilepicsize=<length>sets the width of the profile picture.profilepicborderwidth=<length>sets the width of the profile picture's border.profilepicstyle=profilecircleclips the profile picture to a circle as in the originaltwentysecondcvclass.profilepiczoom=<float>sets the zoom factor for the profile picture. Together with the two options below, this allows you to use your favorite profile picture directly without modification and crop it here.profilepicxshift=<length>sets the xshift for the profile picture.profilepicyshift=<length>sets the yshift for the profile picture.profilepicrounding=<length>sets the rounding radius for the top right and bottom left corner in the default rounded profile picture style.sidebarplacement=rightputs the sidebar to the right of the body instead of to the left.datecolwidth=<length>sets the width of the date column of the body.
Notes:
- Lengths can be specified in any absolute length unit, e.g.
emfor widths,exfor heights, or relative ones like0.5\paperheightor0.3\linewidth. - Colors can be picked from the entire catalogue provided by the
dvipsnames,svgnames, andx11namesoptions of thexcolorpackage. See xcolor package documentation for details and color tables. - Colors can also be redefined within the document body using e.g.
\definecolor{sidecolor}{HTML}{000000}. - Redefining
maincoloris a bit tricky. See #34 for more details.
Sidebar
Sidebars on front and back of the CV are generated using the commands
\makefrontsidebar and \makebacksidebar within the document part of the
LaTeX code. It is recommended to use \newpage immediately before
\makebacksidebar.
Layout elements in front and back sidebar can be added either by using
\addtofrontsidebar{}
\addtobacksidebar{}
where some pre-defined elements like profile picture, name and job title are already set, or completely redefine them using
\renewcommand{\makefrontsidebar}{%
  \begin{sidebar}
    <your code>
  \end{sidebar}
}
You can use all previously defined macros like \cvname and \cvjobtitle or
other elements like the icontable introduced here.
See #22 for a more detailed example.
The sidebar environment makes sure that at least all text will be positioned
correctly within the left column (sidebar) of each page. If you need something
more restrictive, e.g. to prevent overflow when using multiple chart labels,
you can enclose parts of the sidebar content in a sidebarminipage:
\begin{sidebarminipage}
  \chartlabel{Bubble Diagram}
  \chartlabel{with}
  \chartlabel{proper}
  \chartlabel{overflow}
  \chartlabel{protection}
  \chartlabel{for}
  \chartlabel{labels}
\end{sidebarminipage}
Using the sidebar environment, you can also add more sidebar definitions for
additional pages easily. If you want the sidebar to appear on the right instead
of the left side of the body, use the class option sidebarplacement=right.
If you want to remove the sidebar entirely on a single page, just don't call any of the sidebar constructors. Then you may set your preferred margins using
\newpage
% no \makebacksidebar etc.
\newgeometry{
  top=<length>,
  bottom=<length>,
  left=<length>,
  right=<length>
}
The defaults are \leftrightmargin and \topbottommargin. In case you want
to return to the default layout on subsequent pages, simply call
\restoregeometry after the next \newpage.
The text color of sidebar elements can be adapted via the class option
sidetextcolor. For heavier style changes you can also redefine the
\sidetext command to your needs. For example:
\renewcommand{\sidetext}[1]{\textcolor{red}{\texttt{#1}}}
Personal Information
Set personal information via convenience commands
  % logo picture
  \cvlogopic[0.8\linewidth]{pics/logo.png}
  % profile picture
  \cvprofilepic{pics/profile.png}
  % your name
  \cvname{Panda Bear}
  % job title/career
  \cvjobtitle{Panda Scientist,\\[0.2em] Panda of the Year}
  % date of birth
  \cvbirthday{Mar 7, 2019}
  % short address/location, use \newline if more than 1 line is required
  \cvaddress{Park Ave.~1, 555 555 B-Woods}
  % phone number
  \cvphone{+86 555 555 555}
  % personal website
  \cvsite{https://pandascience.net}
  % email address
  \cvmail{panda@bamboo.cn}
  % pgp key
  \cvkey{4096R/FF00FF00}{0xAABBCCDDFF00FF00}
  % any other custom entry
  \cvcustomdata{\faFlag}{Chinese}
- Only
\cvnameand\cvjobtitleare mandatory. - If you want any (optional) entry not to show up in your CV, simply don't use it. If you don't use any of these convenience commands, the personal information table will not appear at all.
- The email address will be automatically linked with
mailto:email. - Your website will be hyperlinked as well.
- For the pgp key, the first argument defines the displayed text which is
linked to a keyserver searching for the ID in the second argument.
Note: For safety, you should use your key's long ID or its fingerprint in the second argument. - The
\cvcustom{<icon>}{<text>}macro shows how to define new lines using an icon as first and some text as second argument. Behind the scenes, this command is actually used to define the other convenience commands in the above example.
If you don't like the default style of the "personal information table", you can define your own via
\begin{icontable}[<arraystretch=1>]{<width 1st column>}{<space between columns>}
  \personal{<icon>}{<text>}
  \social{<icon>}{<url>}{<text>}
\end{icontable}
where the width of the 1st column will also determine the size of all icons in this column, since icons are scaled to maximum width of their cell. For visual purposes, you can fine-tune the space between icons and corresponding text with the 2nd mandatory argument. The optional argument determines the spacing between table lines, which is only important for small icon heights (i.e. small 1st columns).
\personaltakes an icon and a text. The icon is passed to\circleicon{<icon>}, which draws a circle filled withmaincoloraround the icon symbol. The symbol itself appears white.\socialtakes an icon and url + text.Textwill be hyperlinked tourl. In caseurlis empty, your LaTeX compiler will throw a harmless warning about "Suppressing link with empty target" and text will not be hyperlinked. The icon itself is passed to\socialicon{<icon>}, which simply resizes the icon symbol and draws it inmaincolor. This version is the preferred one for social network icons (see example).
The default "personal information table" uses
\begin{icontable}[1.6]{1.7em}{0.4em}
  \personal{<icon>}{<text>}
\end{icontable}
Further Sidebar Style Elements
Section heading
\profilesection{<section title>}Simple skill containing only an icon and some text and with optional indentation
\skill[<indent>]{<icon>}{<text>}Pointskill consisting of an icon, text, the number of points and optionally the maximum possible number (default: 5). Some examples:
\pointskill{<icon>}{<text>}{<points>}creates a skill using a Font Awesome or Academicons icon with some text and a ranking of
<points>out of 5 points.\pointskill{<icon>}{<text>}{<points>}[<maxnum>]creates a skill using a Font Awesome or Academicons icon with some text and a ranking of
<points>out of<maxnum>possible points.\pointskill{\flag{DE.png}}{German}{5}creates a language skill using a flag-icon, which has to be indicated using the
\flagcommand in order to inform the class that the icon should not be colored using\maincolor.Barskill consisting of an optional height argument as well as a mandatory icon, text and percentage of how far the skillbar should be filled
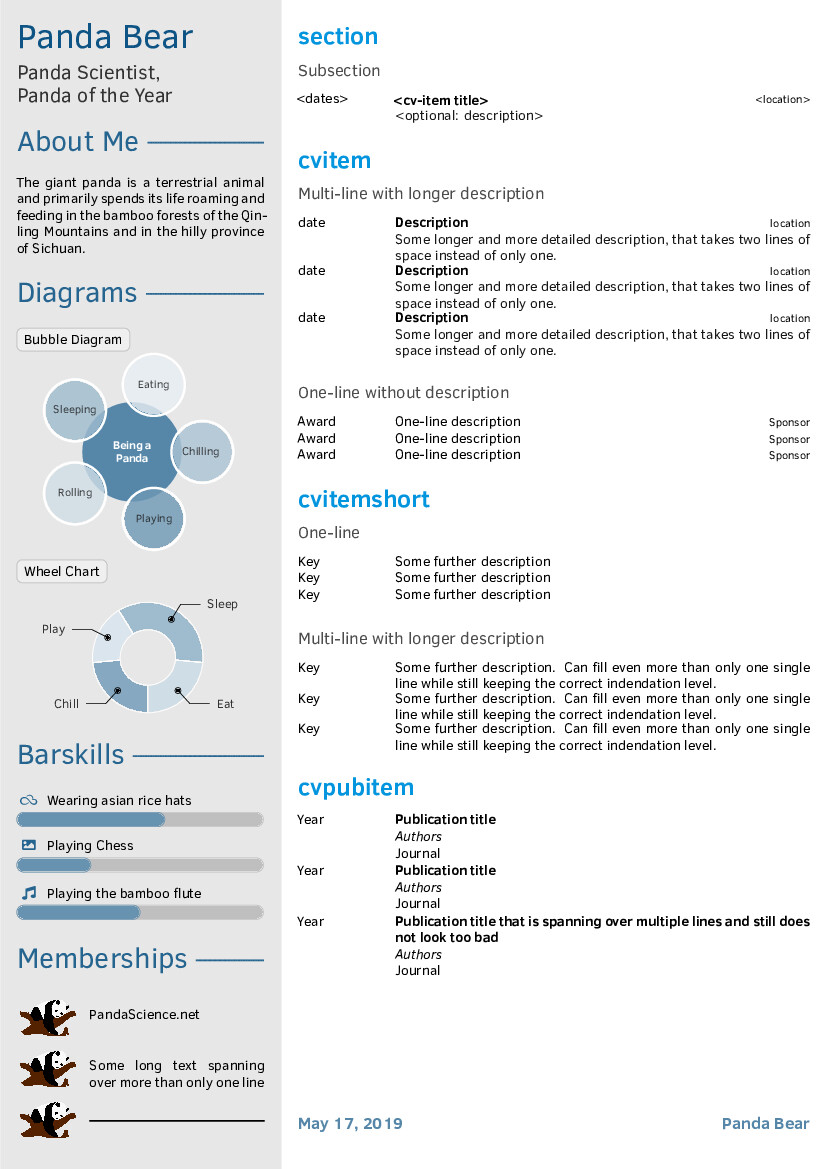
\barskill[<height>]{<icon>}{<text>}{<percentage>}"About me" text
\aboutme{<text spanning multiple lines>}Rounded and colored label for e.g. charts and other graphics
\chartlabel{<text>}Wheel chart
\wheelchart{<outer radius>}{<inner radius>}{% <percentage>/<spacing>/<color>/<text>, <percentage>/<spacing>/<color>/<text> }- Percentages should add up to 100
Memberships
\begin{memberships}[<separation>=1em] \membership[<iconwidth>=4em]{<logo>}{<text>} \membership[<iconwidth>=4em]{<logo>}{<text>} \membership[<iconwidth>=4em]{<logo>}{<text>} \end{memberships}- Width of the 1st column containing the icons is equal to the width of the largest icon such that all text entries in the 2nd column are aligned.
Social Networks
\begin{socialnetwork}[<separation>=1em] \social{<icon>}{<url>}{<text>} \social{<icon>}{<url>}{<text>} \social{<icon>}{<url>}{<text>} \end{socialnetwork}- Another icon style that could be used for e.g. social network icons from Academicons, but is working for FontAwesome icons as well.
textwill be hyperlinked tourl.textmay be formatted as preferred like usual via e.g.\texttt{}etc.
Body
The right part of the CV containing tables for sth. like "working experience"
has to be defined within the document environment.
To prevent unwanted line breaks in dates, the width of the first column in the
body can be adjusted via the datecolwidth class option.
Section and subsection headings
\cvsection
\cvsubsection
CV items should be enclosed by
cvtable, independent of the item type. Possible types are:\begin{cvtable}[<arraystretch>=1] \cvitem{<dates>}{<title>}{<location>}{<description>} \cvitem{<dates>}{<title>}{<location>}{} \cvitemshort{<key>}{<description>} \cvpubitem{<title>}{<author>}{<journal>}{<year>} \end{cvtable}cvitemincluding a description will make the title bold, left-align the date, right-align the location and put the description indented on the next line. The description itself will be initemtextcolordefined in the class options.cvitemmissing a description will add a one-line item in the style of the former one but with a "normal" title instead of a bold one.cvitemshortleft-aligns<key>followed by its description.cvpubitemadds an entry with left-aligned year/date, bold title on same line followed by italic author and normal text journal, each on its own line.<arraystretch>modifies the spacing between items ofcvtable. For tables ofcvitem, you should use at least 1.5, forcvitemshortandcvitemwithout description, the default value is sufficient.
Coloring
cvsection,cvsubsectionand description text colors can be defined as described in class options.Name and job title combination with proper spacing, font and color
\nameandjobFinalizing the CV with a place, date and signature as common practice in e.g. Germany is done via
\cvsignature
Font Configuration
Change the default font either by loading the corresponding package, e.g. for google noto
\usepackage[sfdefault]{noto} % use noto google fontor by using XeLaTeX's option to load local fonts directly via fontspec
\usepackage[quiet]{fontspec}
\newfontfamily\headingfont[Path = fonts/]{segoeuib.ttf}
When working on multi-language documents, I highly advise against the usage of pdfLaTeX. Since I have only little experience with LuaLaTeX (but will probably switch to the latter soon), I can only provide instructions for XeLaTeX for now. There you first need to load the
polyglossiapackage and set fonts for each language separately. For latin-based documents with e.g. some arabic text snippets then use\usepackage{polyglossia} \newfontfamily\arabicfont[Script=Arabic]{Amiri} \setdefaultlanguage{english} \setotherlanguage{arabic} % typeset arabic snippets in body text with either of \textarabic{...} \begin{Arabic}...\end{Arabic}whereas for non-latin-based documents you can use something like
\usepackage{polyglossia}
\setmainfont{Amiri}
\newfontfamily\englishfont{Clear Sans}
\setdefaultlanguage{arabic}
\setotherlanguage{english}
% typeset english snippets in body text with either of
\textenglish{...}
\begin{english}...\end{english}
For persian languages (farsi), the following should work according to this answer:
\newfontfamily\farsifont[Script=Arabic,Scale=10,Contextuals=Swash]{IranNastaliq}Depending on what font style is your default, you need to use
\arabicfontfs(sans serif) or\arabicfonttt(monospace) instead of\arabicfont.
NOTE: Setting a RTL-font as main font will also flip other parts of the
CV automatically. While this seems to be no problem for most parts as far as
I can tell (I'm not used to RTL at all), it does break some of the skill
commands, notably \pointskill and \membership and leads to some spacing
issues. Anyways, for RTL you probably want to use the
sidebarplacement=right feature as well.
TODO: LuaLaTeX + babel settings
You need to install fonts like Amiri and Clear Sans manually when loading them via fontspec. This is not necessary for mono-language documents where you can simply switch fonts like shown in the first example by using the respective LaTeX packages directly.
If you are looking for a specific icon, say LinkedIn, you should first search the FontAwesome gallery for its name, e.g.
linkedin-inand then find the corresponding LaTeX code in the fontawesome5 package, which is in this case\faLinkedinIn.If you want to increase the line spacing globally, use
\usepackage{setspace}
\setstretch{1.1}
instead of the
arraystretchmodifier. Note, that this will also affect the sidebar content.If you want to change the base font size, use the 'article' class options like
12ptfor all body elements and the paragraphs in the sidebar. Sidebar section titles can be changed via the class optionsidesectionsize. For name and job title font sizes you have to redefine the respective commands as explained here.
Example